Scourge Frigates (5/10/17)
Unlike the PHR, the Scourge were actually relatively straightforward to paint. Unlike the Shaltari, the initial basecoat was metallic, which was still present after many layers of washes. The end result is a sheen that is tinted by the color of the was on top. It gives a slightly "wet" look to the ship. Compared to the photographs in the rulebook, they look very similar.
1) Basecoat
I started with white primer followed by Chrome Silver (Tamiya). I made sure that the coverage was even in preparation for the washes that would be applied later. I then applied 2 coats of Brown wash (Craftsmart) to create a good backdrop for the colored washes later. I used 2 coats as I felt that one coat of wash was still too shiny.
 |
| Chrome (left), after 1 coat of wash (middle), after 2 coats of wash (right) |
I colored the upper part of the hull with two coats of Grass Green wash (Ceramcoat). I tried to keep the wash on the ridges, which gave the frigates a nice transition from green to brown. When the green wash dried, I then applied a Purple wash (Folk Art) to the underside for a nice contrast. This produced a gradient from green to brown to purple on the ships. After the purple wash dried, a thin black wash was applied to bring out the details and to darken the recesses in the front of the ship.
 |
| Frigate after green and purple washes |
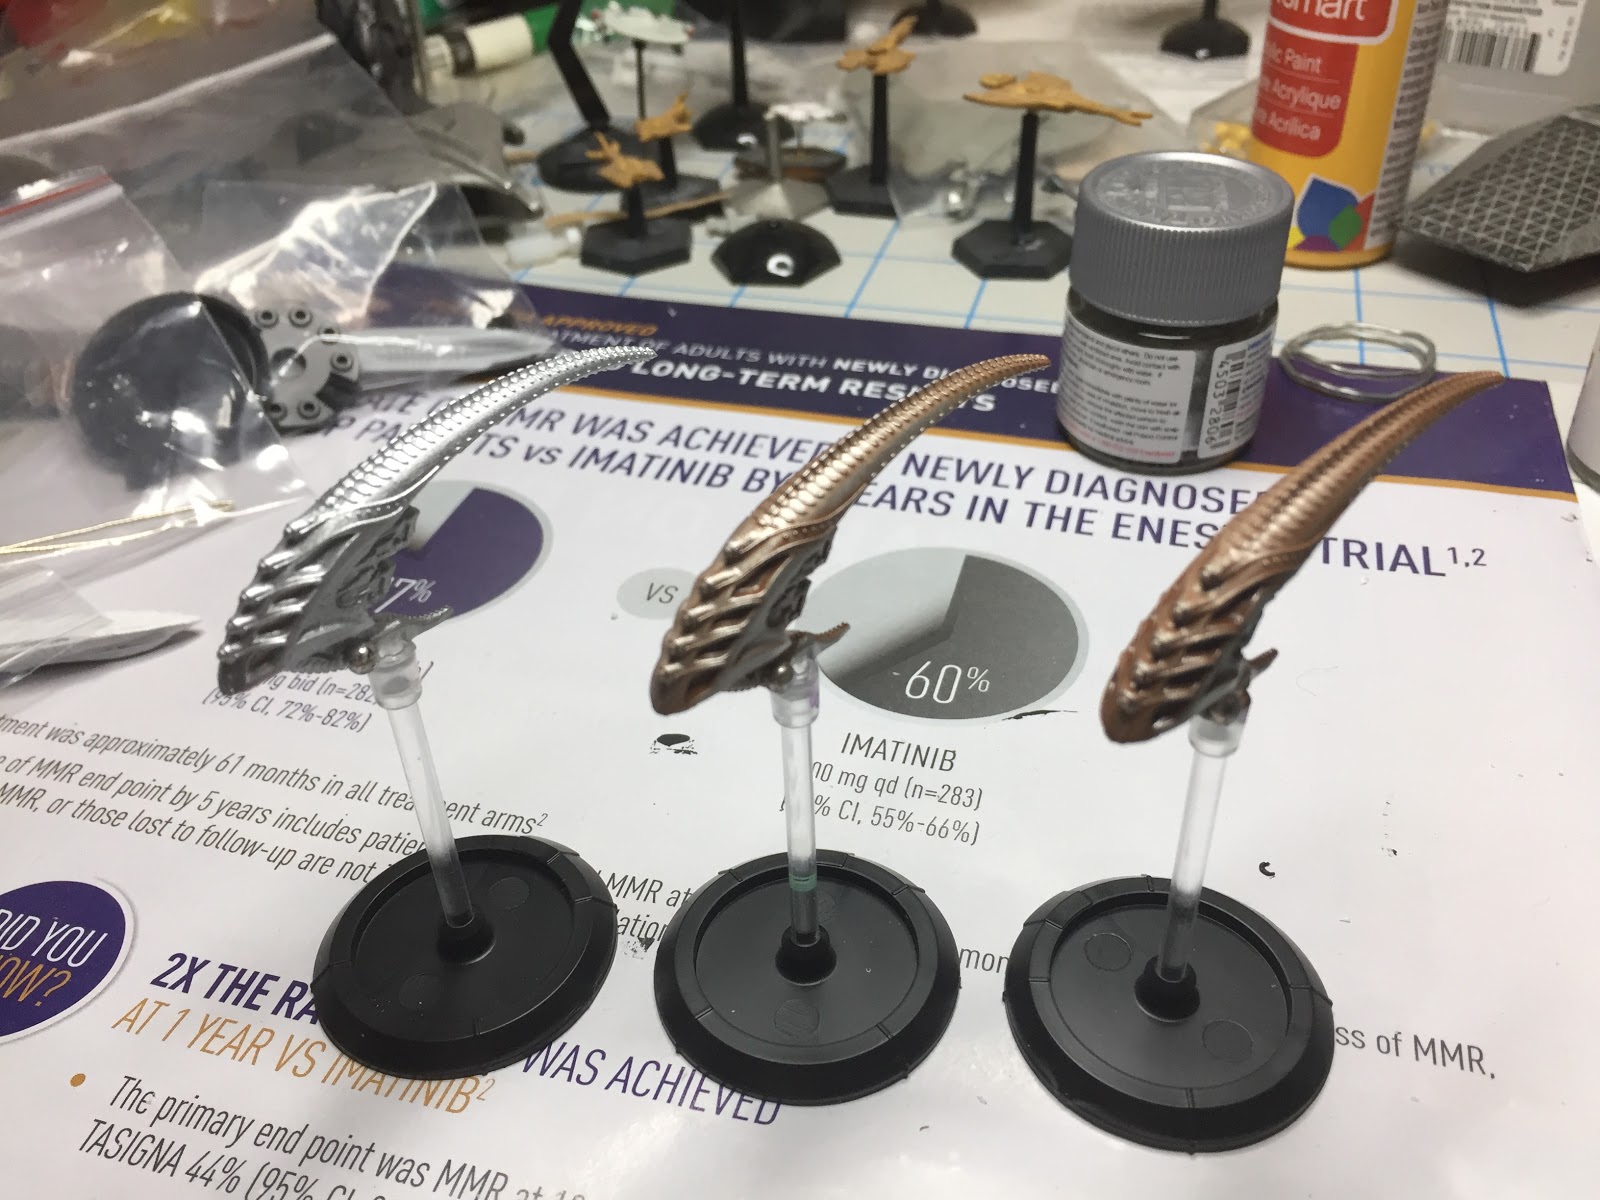
The details were fun to paint on this ship. The large "eyes" were painted starting with Victorian Red (Apple Barrel) followed by Red (Craftsmart), Bright Red (Craftsmart), and finally Tangerine (Apple Barrel) in successively smaller circles to simulate a blend from dark red to dark orange. The smaller "eyes" on top and sides of the ships were painted with Bright Red (Craftsmart) with a Tangerine (Apple Barrel) highlight. Ridges on the ship were painted Chrome Silver (Tamiya). The engine glow was a simple Titanium White (Folk Art). The results are shown below:
 |
| The painted Scourge frigate |
The pods on the sides were painted using the same technique as the main hull. To emphasize a gradient, the pods were attached to the hull (via magnets) for painting and allowed to dry upside-down for green, right side up for purple. This allowed the natural pooling of the wash towards the ends of the pods, which resulted in a darker shade. Details were added using the same techniques as the hull.
 |
| Painted Scourge frigates and weapon pods. |
5) Finishing up
After painting was complete, everything was sealed using a clear semi-gloss coat (Rustoleum). A small amount of clear gloss was used on the larger "eyes" to accent the eeriness of the ships. Overall, I really liked how they turned out and in terms of painting, it wasn't that hard and didn't take that long to obtain a good result. This was the first time I tried using washes on a metallic base to get an "organic" effect. It worked well on these ships and I am very pleased with the results.
PHR Frigates (4/30/17)
Painting the PHR frigates to match the scheme in the rulebook turned out to be a challenge. I'm still not sure how they got the sharp contrast between the armored hull and the mechanics. I had plenty of false starts and had to experiment a bit until I found a way to mimic Hawk's painting scheme. I think I was able to produce a reasonable facsimile using craft paints.
1) Basecoat
I started with white primer followed by a 2 color base coat of ivory white (Ceramcoat) and charcoal black (Ceramcoat). This turned out to be the most difficult part of painting these frigates as you had to be careful to paint the right parts and the boundaries have to be sharp and symmetrical.
 |
| Basecoated PHR frigate |
 |
| Underside of Frigate |
The basecoat was followed by an ivory white dry brush to bring out the details on the underside. A chocolate brown wash (Ceramcoat) was added to highlight the vents and any spillage was covered with ivory white (Ceramcoat). Next, the hinges and engine nacelles were painted with chrome silver (Tamaya). A chrome silver dry brush was also applied to the engine vents and underside hinges. To help with contrasting the wing hinges, a black wash was used to bring out the details. The ends of the wings and some of the ribs were also painted with chrome.
 |
| After dry brush with ivory white and chrome |
3) Highlighting the Engines.
A light dry brush of Metallic Blue Sapphire (Folk Art) was added to the main engine to give it a bluish tint. The wing studs were then detailed with ivory white (Ceramcoat) and the "gems" were painted using Cobalt Blue (Folk Art).
 |
| Detail after wash, drybrushing, and detailing |
 |
| Highlighting the engines |
4) The rest of the ship
The pods and the "tail" of the frigate were painted using the same techniques above. For the Calypso's scanners, I used light blue over the outer scanner array. Afterwards, I used very thinned cobalt blue to cover the entire radar, however, I allowed the paint (actually more like a wash) to pool at the ends. As the paint dried, it creates a nice gradient. The lines were highlighted using thinned black ink applied only to the grooves.
 |
| Completed PHR frigate |
5) Completed Ships
It took me a while to figure out how I wanted to paint this. It was probably one of the more difficult paint scheme I've tried in a while. I am impressed, however, with the results.
 |
| All magnetized and painted |
The magnets hold the ships to the stands well and they do not spin around. The magnets are strong enough that you can pick up the ships by the hull and the stands will not fall off. The tails are held securely with both the magnets and some friction. The various pods fit and hold well and will not fall off during routine manipulation. If I had to do it again, I would probably paint the wings first before gluing them to the main hull. Basecoating that area of the frigate was very difficult and required lots of care and patience. Painting these ships taught me more about when to use washes vs. drybrushing to bring out details. I think I can use a little break from high detail painting. I'll try the Scourge next.
Shaltari Frigates (3/12/17)
I recently received my Dropfleet Commander ships and they just screamed out "magnetize me". I decided to start with the Shaltari Frigates as they seem to be the simplest to magnetize. After reviewing the instructions, magnetization is simple: a magnet on the frigate body, another on the front weapon (I used 2mm x 1mm disc magnets). Painting, on the other hand, looked very complex. As far as I can tell, there are no painting guides on how to paint Shaltari ships. Looking at videos on how to paint Dropship Commander Shaltari (such as this one), I decided to go for the traditional orangish color. This was a nice fleet to paint as I had never really used washes extensively and the Shaltari paint scheme really highlights the use of washes. I generally use craft paints so this would be a good test on both how well the paints work out and in making my own washes for these ships.
1) Prep mini followed by (Model Master) white primer and yellow base coat (Craftsmart Yellow).
2) Wash with red (Craftsmart Red) x2.
 |
| Left: After priming and yellow base coat, Right: after 1 red wash |
 |
| Left: yellow base coat, Right: after 2 washes of red. |
 |
| Close up after 2 washes. |
 |
| After wash with dark brown |
 |
| Mostly complete Shaltari frigate body |
5) Final results
 |
| Completed frigates with interchangeable parts. |
As you can see, the frigates came out better than I expected. The magnets allow for quick interchange and they hold very well. You just have to remember to pick up the model by either the stem or the body. As far as painting, it was easier than I thought it would be. I learned a considerable amount about making your own washes and using them with this project. I am very happy with the results. I think I'll try the PHR next.
No comments:
Post a Comment